Origination-Vendor Relationship Configuration
A relationship is a network configuration between your company and your customers or vendors. By creating a relationship, you will set up the routing logic and rates that enable you to capitalize on the phone calls made on your network.
An Origination-Vendor configuration will enable you to receive traffic whose origination point is a vendor (traffic originates at the Vendor and terminates at you).
Relationship Overview
Here is a high level description of each Relationship component:
Relationship Info: basic information about the Relationship such as Name and Contacts
Trunk Group: a collection of associated Trunks which can be managed through a single dashboard. Each trunk describes the end-to-end connectivity of your network
Rating: the model for charging the customer's usage
Routing: the traffic routing configuration, containing filters and routing rules
Balance: credit and debit notifications and alerts for customers
Invoicing: invoice generation
Portals: generating login credentials for users with specific permissions
Agents: independent external contacts which can refer new customers for your business in exchange for a commission
Logs: history of all changes made to the Relationship
Relationship Dashboard
Create a new Relationship
Modify an existing Relationship
Export all Relationship entries as a .csv file
Activate and Deactivate Relationships
Delete Relationships

Create or Modify a Relationship
Relationship Detail Strip (modify only)
Relationship > Modify
Whenever you Modify a Relationship, you will notice the menu featured in the image below on every tab of the Relationship. It will outline basic information about the Relationship as a reference when modifying the configuration such as:
Relationship Name
Status: enabled or disabled
Last Modified: date the Relationship was last modified
Billing Cycle: associated billing cycle
Last Invoiced: date for the last invoice created
Account Number
Current Balance: amount of credit or outstanding charges
Modifier: last user who modified the Relationship
Trunk Groups: the number of Trunk Groups configured for this Relationship
Relationship Info
Relationship > Create/Modify
Contains basic information about the relationship which act as identifiers. It is split in two sections: Relationship Information (alongside Address and Phone) on the left and Relationships contacts on the right.
Relationship Information
Relationship > Create/Modify > Relationship Info
This page allows for configuration of basic information about the Relationship. The information here is fed into other functions such as Invoices, Trunks and Billing.
Select a logo for the Relationship - This will be displayed on invoices.
Relationship Name - This is the main identifier of the Relationship.
Account Number
Toggle Send Trunk Group Notification - This will send notifications any time there is a change made to any Trunk to any contacts of the Type ‘Technical’.
Website - This will be displayed on invoices and notifications.
Time Zone - This is used for calculating billing cycles and logging actions.

Address & Phone Information
Relationship > Create/Modify > Relationship Info
The Address and Phone information is used to generate invoices for your customers and vendors.

Relationship Contacts
Relationship > Create/Modify > Relationship Info
Contacts are entries which hold your customer or vendor details. In this section you can select the number of Contacts displayed per page, search for a Contact by keyword or:
Create a new Contact
Export contacts as a .csv file
Delete Contacts

Create a Relationship Contact
Relationship > Create/Modify > Relationship Info > Relationship Contacts
Contacts are people designated to receive notifications and emails regarding specific aspects of Perimeter.
If you do not have contacts set up, you will not be able to send notifications or other emails to your customers or vendors.
To create a new contact, you will need to complete the following fields:
Contact Type:
NOC - These contacts will receive notifications whenever there is a change made to a Trunk or Trunk Group.
Billing - Will receive invoices produced by the platform.
Sales - These contacts are known as ‘Agents’ and will receive emails containing details about their commissions.
Balance - Will receive emails with balance limit warnings and outstanding payments.
Rate - Will receive a list of rates associated with specific Trunk configurations.
Email Address: The email address where the person will be contacted
Name: Name of the Contact
IM Address: Instant Messenger address such as Skype
Phone number: Mobile or Landline contact number

Export Relationship Contacts
Relationship > Create/Modify > Relationship Info
In the Relationship Contact section, click on Export
You will begin downloading a .csv containing the Relationship Contact details

Trunk Group
Zones
Trunk Group Dashboard
Relationship > Create/Modify > Trunk Group
In the Dashboard you can select the number of Trunk Groups displayed per page, search for a Trunk Group by keyword or:
Assign a Routeplan to the Trunk Group
Assign a Rate Deck to the Trunk Group
Modify a Trunk Group
Create a new Trunk Group
Export Trunk Groups as a .csv
Activate/Deactivate a Trunk Group
Delete a Trunk Group

Assign Rate Deck
Relationship > Create/Modify > Trunk Group
Rate Decks contain the pricing models used for calls depending on the geographical/geopolitical location of the origination and termination devices. If you do not assign a Rate Deck to a Trunk group, Perimeter will not be able to charge your customers and vendors for the network usage.
You need to select a specific Rate Deck for each type of call in order for the correct rating to be applied to each type of call.
Depending on the type of call that you are configuring, you can assign a Rate Deck as follows:
Select a Trunk Group from the list in the Dashboard by clicking on the 2nd column of the list item
Click on Assign Rate Deck
In the pop-up window, select a Rate Deck from the drop-down menu
After receiving a message saying ‘Assigned Successfully’, you can close the pop-up Window

To unassign a Rate Deck:
Select a Trunk Group from the list in the Dashboard by clicking on the 2nd column of the list item
Click on Assign Rate Deck
In the pop-up window, click on the ‘-’ button on the right of the drop-down menu
After receiving a message saying ‘Unassigned Successfully’, you can close the pop-up Window
Create/Modify a Trunk Group
Relationship > Create/Modify > Trunk Group
This section will describe every field of creating or modifying a Trunk Group. If you are interested in setting up a specific Trunk Group configuration for Wholesale or DID, click here.
Trunk Group Basic Information
Relationship > Create/Modify > Trunk Group > Create/Modify
In this section you will need to provide core information about Trunks such as:
Name: Trunk Group name
Direction: Origination - you are receiving traffic from someone, either a Vendor or a Customer. An Origination-Vendor configuration would mean that you are receiving traffic whose origination point is a vendor (Traffic originates at the Vendor and terminates at you)
Relationship - Vendor
Enable NAT: NAT helps improve security and decrease the number of IP addresses an organization needs.
External Name
Copy
Tech Prefix: may be assigned to an originating or terminating Trunk Group to differentiate it or to provide an added level of security. We always recommend that you set a Tech Prefix on an Originating Trunk Group, even if you don't plan on having multiple originating Trunk Groups. Note: It is a REQUIREMENT to have a Tech Prefix assigned to a Trunk Group if you have multiple originating Trunk Groups, unless the originator is differentiating their traffic solely by IP Address and those addresses don't overlap.

Limit Options:
Ports: Number of ports that you want to assign to the Trunk Group
CPS: The number of calls which can be pre-selected. We recommend a default ratio for Ports:CPS of 10:1
Max Call Duration: Calls which exceed this duration will be terminated
Max PDD: Maximum delay between the time the call is dialed until it the caller hears ringing
BTN - Billing Telephone Number
Capacity Group - Select Capacity Group
Time Limit of Day - Only call between specific hours in the day
Enable Triggers
ANI Normalization - Toggle ANI normalization for inbound ANI(s) that are 10 digits long
Bursting Threshold

Add Trunks
Relationship > Create/Modify > Trunk Group > Create/Modify

Note:
- Only 1 [IP, Port and Protocol] configuration can be added against 1 Origination Trunk and 1 Termination trunk
- You can reuse the same [IP, Port and Protocol] configuration only if you add a Tech Prefix for the other Trunk Groups. Information about Tech Prefixes can be found here.
To add a Trunk you will need to provide the following:
Trunk Type:
IP address: Provide IP Address and Port
or
Registration: Provide Username and Password
Protocol: UDP/TCP/TLS
Switch IP: You will need to give the Switch IP to your customers and vendors in order to run traffic through the trunk. Only one IP is necessary for both Termination Vendors and Customers. This IP is located at the bottom of the Add Trunk section. You can also find your Switch IP and your Media IPs in the Settings Tab, under General Settings.

All the created Trunks will appear under the Trunks section.
Media Handling
Relationship > Create/Modify > Trunk Group > Create/Modify
There are 4 settings for handling media content:
Filtering: This setting allows you to specify which codecs are allowed on this Trunk Group. Note: All codecs are passed through by default.
Anchoring: This setting allows you to anchor (proxy) the media through the Peeredge Platform. This feature is useful for media topology hiding or going through firewalls. Note: The new Peeredge supports on-demand transcoding for media anchored calls. If the SBC determines that there is not a suitable codec negotiation on anchored calls, the system will automatically negotiate the suitable originating and terminating codec and transcode the session.
Dynamic Transcoding: This setting allows for automatic switching to a different format or bitrate without compromising on the original quality.
Secure RTP: Provides message authentication and integrity, encryption and replay attack protection to the RTP data.

Signaling Manipulation
Relationship > Create/Modify > Trunk Group > Create/Modify
This section will enable you to set up a rule to find and replace a string in a packet with anything of your choice. This is achieved using Regular Expressions.
To create a manipulation expression provide:
Header
ANI
DNIS
SIP Code
Search: The section of a string to be replaced.
Replace: What to replace the searched section with.
Press Create

Route Advance Logic
Relationship > Create/Modify > Trunk Group > Create/Modify
Given a list of HTTP status codes, you can select set up routing based on the responses received. Route Advance Logic converts all codes mentioned in the regex to a 503. If you remove a code from the regex, as well as UNchecking “normalize sip code” in the trunk group settings, you will return that code back to the customer.

Triggers
Relationship > Create/Modify > Trunk Group > Create/Modify
Note: In the Trunk Group Basic Information section, you must have Enable Triggers checked for this menu to be displayed.
To create a trigger you must provide:
Name
Type
Attempts
Completions
Minutes
ASR
ALOC
Revenue
Cost
Profit
Margin
PPM
MOS
SDR
NEPR
Ports
CPS
Condition
Value
Trigger Expiration
Contact Type
Time Frame
Always
Custom
Start Time
End Time
Weekdays
Once these are completed, press Create

Export Trunk Groups
Relationship > Create/Modify > Trunk Group
After clicking on the Export button, you will need to type in a name for the .csv file.
You can choose whether to export the Trunk Group Configurations.
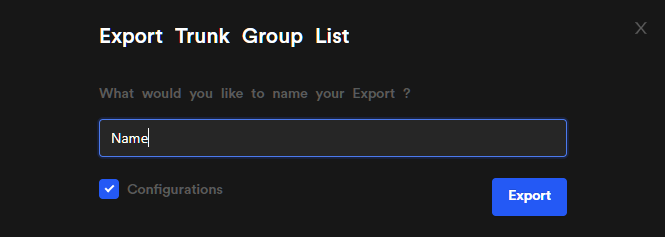
The export will contain:
Relationship Name
Trunk Group Name
Status
Directions
Relationship Type
Rating Assigned
Routeplan
Trunk (Count)
Monitoring
Media Anchor
Ports
CPS
Last Modification Date
External Name
NAT
Tech Prefix
Max Call Duration
Filter Media
Anchor Media
Transcoding
Codecs
Regexp Rule
Hunting Type
Egress IP
Send NDPI
Exporting the Configurations will include:
IP Address
Port
Protocol
Weight
Trunk Monitoring
Name of Modifier
Hunting
Username
Server IP
Trunk Type
ANI Override
Failover Order
Activate/Deactivate Trunk Group
Relationship > Create/Modify > Trunk Group
Use the toggle switch on the right of the Trunk Group list entry to activate or deactivate it.
Delete Trunk Group
Relationship > Create/Modify > Trunk Group
Press on the red delete icon and confirm to delete a Trunk Group and all its associated configurations.
Capacity Dashboard
Relationship > Create/Modify > Trunk Group
This feature will allow customers to create a special capacity group based on port/CPS limits that can be assigned to multiple Trunk Groups and count their individual usage towards the group limits. This will allow customers to share capacity within the same relationship without the limitations of each individual Trunk Group.
From the Capacity Groups Dashboard, you can:
Create/Modify a Capacity Group
View assigned Trunk Groups
View Capacity Group Triggers configuration
Delete a Capacity Group

Create/Modify a Capacity Group
Relationship > Create/Modify > Trunk Group > Capacity Groups
To create a Capacity Group, provide the following:
Capacity Group name
External name
Port Limit
CPS Limit
Description
Bursting Threshold
Port Limit

Assign a Trunk Group
Relationship > Create/Modify > Trunk Group > Capacity Groups
To assign a Trunk Group
Select a Trunk Group from the drop-down menu
Press Assign

Create/Modify a Capacity Group Trigger
Relationship > Create/Modify > Trunk Group > Capacity Groups
To Create/Modify a Capacity Group Trigger:
Provide a Name
Select the Type
Ports
CPS
Select a Condition
Less Than
Greater Than
Provide a Value
Select a Trigger Expiration
Select a Contact Type
NOC
Billing
Sales
Balance
Rate
Trigger
Select a Time Frame
Custom
Always

Delete a Capacity Group
Relationship > Create/Modify > Trunk Group > Capacity Groups
To Delete a Capacity Group
In the Capacity Dashboard, click the red Delete Button
In the pop-up window, click on Delete
Rating
Rate Sheets are mandatory for allowing perimeter to charge for calls made on your network.
Rating Dashboard
Relationship > Create/Modify > Rating
In this dashboard you can see the current Rate Sheets available. Details included are the Type of the Rate Sheet, Direction, Relationship and Effective Date.
Select the Rating Template - click here to find out more about Templates
Assign to Trunk Group - this process is mandatory for applying the charges to calls
Modify an existing Rate Sheet
Create a new Rate Sheet
Export the list of Rate Sheets as a .csv file
Distribute the Rate Sheet - sends the Rate Sheets to Rating Contacts
Download the single Rate Sheet as a .csv
View the Ratedeck History - see changes made to the Ratedeck
Modify the Rates
Delete the Rate Sheet

Select the Rating Template
Relationship > Create/Modify > Rating
Using the drop-down menu, you can choose which Rating Template you want to use as a default. To find out more about setting up templates, click here.
Assign to Trunk Group
Relationship > Create/Modify > Rating
Only after assigning a Ratedeck to a Origination Vendor Trunk Group you will be able to charge your customers and vendors for using your network. To assign a Ratedeck:
Press the Assign to Trunk Group button
In the pop-up window, press Add Trunk Group
Select a Trunk Group from the drop-down menu
Press Assign
To unassign:
Press the Assign to Trunk Group button
Press the Minus icon at the right of the respective Trunk Group

Create / Modify a Rate Sheet
Relationship > Create/Modify > Rating
To Create or Modify a Rate Sheet
To create a new Rate Sheet, press on the blue Create button
To modify an existing Rate Sheet, click on an item from the list to highlight it and press on Modify
Provide a name for the Ratedeck
Select a Location for the geopolitical area in which the call will be set up
US & Canada
International - every other country including the EEA
Set the Direction of the configuration as Origination - you are receiving traffic from an originating device
Select the Deck Type - Different Deck Types are available depending on the Location and Direction
Set the Relation as Vendor
Select the number of Rounding Digits
Select the Expiration Date
Select the Effective Date - By default, this is set to the current date
Download a Sample - use as a template for creating Ratedecks
Select File - To import a .csv file as a Ratedeck source
Save

Ratedeck Mapping / Importing a Rate sheet
Relationship > Create/Modify > Rating
When you upload a Rate Sheet, you must align the headers from your .csv file to the headers provided in Perimeter:
Select an existing Rate Sheet (by clicking on the list item in the second row) and click on Modify
Click on the Select File
Select your .csv file and click Open. A new section named Ratedeck Mapping will appear in Perimeter
All the headers from your .csv file will appear in the drop-down menus. You will need to assign a header to each of the drop-down menus
(International Only) - You can select the Append Rates checkbox. This will add another drop down menu named Change Rates to which you assign your .csv file headers. Appending will allow you to upload rate changes that take effect at different times as the international rates are distributed
After you finish mapping all the headers to the drop-down menus, click on Save & Upload

Appending International Rates
When appending International Rates, you can choose between the following options:
Keep Future Dates
Overwrite
Orphan Codes: Allows you to load a full A-Z deck on top of the previous deck and clean out any remaining codes from the system that are not present in the new deck. You can select how many days out you want to orphan the codes so that you can continue to use the existing rates until they are to be deleted.

Download a Rate Sheet Sample as a .csv file
Relationship > Create/Modify > Rating
Select a Rate Sheet and click on Modify
Click on Download Sample
You will start downloading a .csv file

Export the Rate Sheet List
Relationship > Create/Modify > Rating
In the Rating Dashboard, click on Export
You will begin downloading a .csv file containing all the Rate Sheets associated to this Relationship

Distribute the Rate Sheet
Relationship > Create/Modify > Rating
In the Rating Dashboard, click on the email icon at the right of the list items
In the pop-up window, press on Distribute (please ensure that you have added a contact type “Rate” in the Relationship Info tab to receive the Rate Sheet)

Download Rate Sheet as a .csv
Relationship > Create/Modify > Rating
In the Rating Dashboard, click on the download icon at the right of the list items
You will begin downloading a .csv containing the Rates
View the Ratedeck History
Relationship > Create/Modify > Rating
In the Rating Dashboard, click on the view icon at the right of the list items
A pop-up window will display the latest changes
You can download the rates for each version using the download button at the right of the list items
You can distribute all the entries from the Ratedeck History

Modify the Rates
Relationship > Create/Modify > Rating
In the Rating Dashboard, click on the green icon at the right of the list items
A pop-up window will display all the previous rates that were applied from this Rate Sheet.

Delete the Rate Sheet
Relationship > Create/Modify > Rating
In the Rating Dashboard, click on the red icon at the right of the list items
If the Rate Sheet is assigned to a Trunk Group, you will need to unassign it before deleting
Press on Delete
Routing
Balance/Payment
This section keeps logs of your customer’s usage and credit. You can send notifications containing balance and usage to the Balance Contacts.
Note:
- This function is generally used for Customer Transactions. However, it can be used to track Vendor credit if necessary.
- This function only works when a Balance Warning Template, Balance Suspend Template and contacts are correctly set up.
Balance/Payment Dashboard
Relationship > Create/Modify > Balance/Payment
From the dashboard, you can set the following:
Balance Warning Amount - Send out a warning notification to your customer when their usage reaches this value
Balance Warning - Select the Balance Warning Template used to send out the warning notification
Disable Balance Offsets - Check this option to disable balancing between customer and vendor trunks
By default, the system will attempt to balance your spending between what you send to a vendor and what they sent to you as a customer within the same Relationship. When disabled the balance will show purely what the customer trunk has spent and the vendor trunks has spent.
Balance Suspend Amount - Suspend your customer’s services when their usage reaches this value
Balance Suspend - Select the Balance Suspend Template used to send out the warning notification
Send Daily Balance Email - Toggle daily notifications containing the balance at the end of the day
Create/Modify a Transaction
Export Transaction List as a .csv
Delete Transaction

Create/Modify Transaction
Relationship > Create/Modify > Balance/Payment
Press on the Create/Modify button
Select a Transaction Type
Payment
Credit
Select a Payment Type
Debit
Credit
Type in the Transaction Amount
Provide the Date when the transaction took place
Select the currency in which the transaction took place
Enter a Payment Memo

Export Transaction List
Relationship > Create/Modify > Balance/Payment
In the Balance/Invoice Dashboard, click Export and provide a name for the file
You will begin downloading a .csv containing the Transaction details

Delete Transaction
Relationship > Create/Modify > Balance/Payment
In the Rating Dashboard, click on the red icon at the right of the list items
In the pop-up window, press on Delete
Portals - Create a portal for your carrier
Portals allow external contacts to access a page outlining select details about the Relationship.

You can select which information to provide on your portals from the following:
Daily Performance Email: A daily email sent to the configured contacts containing a performance report for the Relationship
Show Costs
Show Balance
Display Rates
Re-enable on Payment
Apply PayPal Percentage and Fee
Percentage Fee
Total Fee
Allow carrier to change IPs
Display Accounting Info (allows the Portal user to access the Send Payments page)
PayPal Limit
Portal Template
Show Carrier Payments
Create/Modify a Portal User
Export a list of Portal Users

Create/Modify a Portal User
Relationship > Create/Modify > Portals
To enable a user to access the portal, you will need to provide:
Username
Name
E-mail address
Phone number

Export a list of Portal Users
Relationship > Create/Modify > Portals
In the Portals Dashboard, click Export and provide a name for the file
You will begin downloading a .csv containing the Portal User details
Portal - View (what your carrier will see)
When the recipient of the portal invite logs in, they will see an interface with options based on the information selected for your carrier to view.
Relationship Portal Dashboard View:

Relationship Portal Reporting View:

Relationship Portal Diagnostic View:

Relationship Portal Accounting Send Payment View (requires the Display Accounting Information checkbox to be set when creating the user):

Relationship Portal Accounting Rates View:

Relationship Portal Accounting Invoice View:
Agents
Agents Dashboard
Relationship> Agents
In the dashboard you can:
Create/Modify agents
Export a list of agents as .csv

Assign Agents
Relationship > Agents
You can assign Agents to the appropriate Trunk Groups and determine the Commission Type and Rate.
Select a Trunk Group to be associated with the Agent
Select the Commission Type
Profit
Revenue
Select the Agent - you can set up Agents by following this tutorial
Type in the Commision Rate
Select the start date for the commissions

Logs
Any change submitted to a Relationship will be stored in the Logs tab. You are able to search for changes and export those as a .csv file for audit purposes.

Related Articles
Origination-Customer Relationship Configuration
A Relationship is a network configuration between your company and your customers or vendors. By creating a Relationship, you will set up the routing logic and rates that enable you to capitalize on the phone calls made on your network. An ...Termination-Vendor Relationship Configuration
A Relationship is a network configuration between your company and your customers or vendors. By creating a Relationship, you will set up the routing logic and rates that enable you to capitalize on the phone calls made on your network. A ...Quick Start Guide
Introduction What is Perimeter and what does it do? Perimeter/ECO enables carriers and enterprises to optimize global voice networks while leveraging machine learning technologies to automate the management and resiliency of global voice networks ...Reporting
This article will describe the Reporting tools and functions available from the Reporting menu. Generating Graphs To generate a graph for the reports available through the Reporting menu, you will need to: Navigate to your required reporting page ...Termination-Customer Relationship Configuration
A Relationship is a network configuration between your company and your customers or vendors. By creating a Relationship, you will set up the routing logic and rates that enable you to capitalize on the phone calls made on your network. A ...